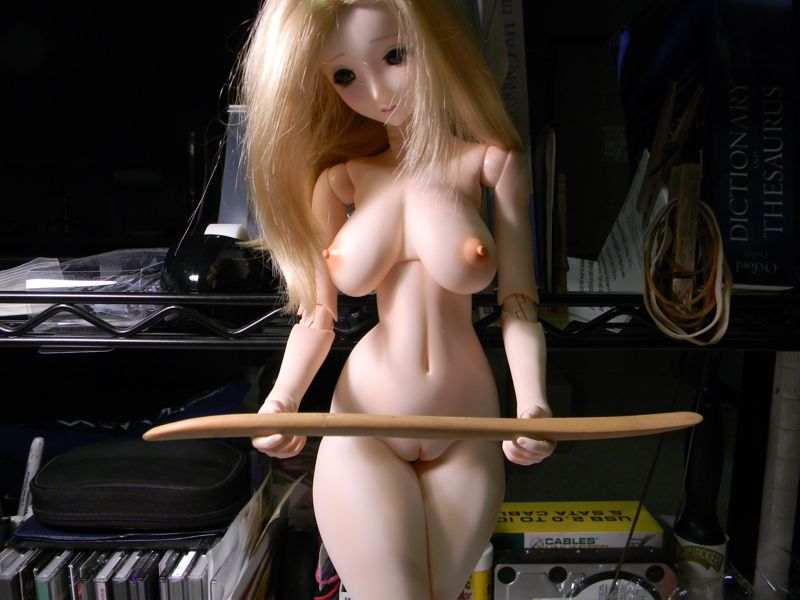
For some reason her Japanese name machine translates to "Walnut".
Specifications
● Head: Type-H (“Miho”), 16mm eyes, 7 inch wig size, face-up included
● Eyes: Original Doll Eyes - Grey 16mm
● Body: Upper torso/Type-C3, lower torso and thigh/Type-H, shin/Type-C, upper and lower arms/Obitsu50, high heel feet (magnets not included), white skin fully blushed
● Bust, abdomen, thighs are Soft Skin
● Option parts included: 2 additional types of hand parts (fully blushed)/open hands, fist hands, gripping hands (on body)
● Inner Frame: Obitsu48cm
The first thing I noticed was the Soft Skin parts are extremely soft and deform with the slightest touch. As I was unpacking I noticed there were deformations in both thighs where the hands had been press against them during shipping.


With the arms pulled away from the thighs, the deformations remained. A little time with the hair dryer and the thighs returned to their original (as molded) shape.


As you can guess, the Soft Skin parts are thin. In this picture we have the Soft Skin part on the left and a regular Type H abdomen.

The Soft Skin part has a wall thickness of 1.68mm.

While the regular Abdomen has a wall thickness of 2.48mm.

Due to the nature of the slush molding process these dimensions will no doubt vary slightly from part to part.
Angel Philia recommends filling the interior of the Soft Skin parts to help them hold their shape. Having several weeks between pre-order and delivery, I decided to try stuffing Walnut with polyester batting, a.k.a. quilt batting. This material is soft, light weight, durable, and will return to its shape after being crushed. The coarse nature of the material allows it to grip itself helping hold it in position. I had some on hand that had a nominal thickness of 3/8” so I went ahead with that.
During disassembly I noticed the holes in the shoulder of the bust for the arm pegs were incompletely trimmed.

On the left arm this flash had been pulled into the socket in the chest piece during assembly at the factory. The flash was thick enough to shatter the socket.

I had a “repaired” spare (very loose) on hand and continued with that. A new chest part will have to be purchased.
Next I continued with the stuffing of the bust with the batting. Two, 2” squares of batting were wadded up and stuffed in each breast cavity.

Another 2”x4” wad was stuffed on each side of the chest part in the front.
Next was stuffing the abdomen. Knowing the difficulty of removing and replacing the spine and hip parts, I opted to stuff the batting around the spine into the abdomen. To assist in the stuffing and placement of the batting inside the confined abdomen, I used a thin wooden clay sculpting tool to push the batting into place the sculpting tool is slim and not very sharp so there was little chance of poking a hole in the thin vinyl.

Six 2”x4” pieces of batting were folded in quarters and pushed into the butt and hip areas symmetrically. The number of pieces inserted was determined by putting in a single piece at a time, then checking to see if after the area when squeezed returned easily to its proper size/shape without making the part feel too firm. Several 2”x4” pieces of batting were put into the front stomach area.
With the lower abdomen satisfactorily stuffed, I cut several pieces of batting about 2”x12”, folded them in half along the long dimension and then stuffed them symmetrically in the waist area till the abdomen was filled up to the bottom of the top peg of the spine. Note that very little batting is between the spine and the back of the waist area.

Assembling the bust and torso by making the chest part to spine connection blindly proved difficult so I removed the chest part from the bust and placed it on the spine. Then I replaced the batting that had come out of the bust and inserted the the bust back over the chest part. This process worked much better.
Next came the thighs. I did not want to remove the legs from the body so I pulled the bottom of the legs off from the knee down. If the thigh bones come out with the knee joint, remove them from the knee and reinsert them into the hip joints. Once the thigh is stuffed you won’t be able to find the hip joint to replace the thigh bones.

2”x 6” pieces of batting folded in half to form 1” x 6” pieces were stuffed into the thighs, working them in around the thigh bone so the thigh bone remains centered in the thigh vinyl. Continue adding batting strips till the thighs are padded satisfactorily. Work your way to the end of the thigh bone.

With the thighs stuffed, reattach the lower legs.
The batting appears to be performing as desired. The Soft Skin parts deform easily yet spring right back into position.


The Soft Skin parts perform as advertised. Their softness allows those parts to flatten against each other similarly to real body parts.


Soft Skin does have its limitations. Bending/compressing a part too much can cause unnatural wrinkles and folds in the vinyl. You will have to experiment with the Soft Skin body to determine where these limits are. Next we will have to throw some clothes into the mix and see what happens.


